Vim and Apple’s Touch Bar

Since we basically lost the escape key with the new MacBook Pro models that came out at the end of 2016, Vim users needed a solid backup plan if they were to get one of the new laptops. Harry Roberts has put together some really nice things to consider with regards to the escape key:

For almost as long as I’ve been using Vim–which is a long time now–I’ve been using jj and jk to leave Insert mode. These mappings are on the Home Row, so always easy to reach, and the letter pairs very rarely (if ever) occur in the English language. If there were words that contained jj and jk next to each other then I would be flung straight into Normal mode any time I tried to write them. (The reason I haven’t mapped kk to Escape is because it does occur within words, e.g. bookkeeper.

What did I do? Well, as a macOS Sierra user, I just followed the advice of a former colleague and remapped my Caps Lock key.

Update: As of macOS Sierra 10.12.1, the Caps Lock -> Escape remapping can be done natively in the Keyboard System Preferences pane! To remap without any 3rd party software, do the following:

  • Open System Preferences and click on ‘Keyboard’
  • Click on ‘Modifier Keys…’
  • For ‘Caps Lock (⇪) Key’, choose ‘⎋ Escape’
  • Click ‘OK’

(See screenshot for reference).

Ending the dyslexia legibility experiment

Back in February, I decided to do a little experiment right here on my journal website, whereby I added a simple JavaScript function to toggle styling that should increase the legibility for people with dyslexia. Partly, it was for me to do some JavaScript hacking, but also to try and get some feedback about the validity of the write up “A Typeface For Dyslexics? Don’t Buy Into The Hype”.

Nine months have passed since I published that post, and I feel it’s time to remove the toggle from my website. While I did get some amount of response from people suffering from dyslexia, I felt it wasn’t quite enough. I’ll update the original post in due time and move the experiment into its own lab page.

I’d like to thank those to gave feedback and helped me do this little experiment (you know who you are 😊).

Cache busting with Jekyll and Gulp

Since I love tinkering with my journal, updates to both my stylesheets and JavaScript files are quite frequent. Up till now, I’ve just let Gulp generate my files and then I included this in my Jekyll templates in a hard-coded fashion. But it then hit me that maybe I should do something to make sure that recurring visitors always get the latest version of my JavaScript and CSS, if they’ve been changed.

What is cache busting?

In short, cache busting is a way to make sure that a client downloads your very latest version of a file. The simplest way to do this is to either give the file a random name, like ab459ef32da.css or, in my opinion, the nicer variant of adding a query string along the lines of styles.css?version=ab459ef32da. Then, each time you do a change to this file, you make sure that the random string changes, and you’ve successfully busted that cache.

Update (2016-02-26): Apparently, according to GTmetrix, some proxies do not cache static resources with a query string in the URL. They recommend that you encode the unique string into the file names themselves.

Making Gulp and Jekyll work together

As mentioned, I use Gulp to minify and concatenate both my CSS and JavaScript. The output files are hardcoded in my Gulpfile.js so all Jekyll needed was the paths to both files in the templates and be done with it.

<link rel="stylesheet" href="/gui/css/styles.css">
<script src="/gui/js/main.js" defer></script>

In order to get some cache busting going, I needed the following:

  • Give my generated CSS and JavaScript files a unique string everytime they are updated with Gulp
  • Make this string available to Jekyll somehow to append it when linking to the files in the Jekyll template
  • Automate it so I don’t have to think about it anymore

Since I only want the string to change when I’ve done something to either the JavaScript or CSS, the best approach would be to use the MD5 checksum from each generated file to indicate when something has changed. So I needed some sort of Gulp plugin to grab the MD5 and then do something with it. But first, we need to sort out how to get this data into Gulp.

Enter the data folder

Jekyll has this nifty feature that lets you define custom data.

In addition to the built-in variables available from Jekyll, you can specify your own custom data that can be accessed via the Liquid templating system.

Jekyll supports loading data from YAML, JSON, and CSV files located in the _data directory.

–– Jekyll documentation page on data files

Perfect! This will allow us to pass information into our Jekyll templates. Reading on in the Jekyll documentation lets us know that if we create _data/cache_bust.yml, the contents of this file will be available in Jekyll via {{ site.data.cache_bust }}. If the cache_bust.yml just contains a string, the aforementioned Jekyll tag will output just that. That’s all we need for this job.

Getting Gulp to write an MD5 hash to the data folder

There’s a plethora of cache busting plugins for Gulp over at npmjs.com. But all I need is something that grabs the MD5 checksum of my generated files and write that string to a file in the _data folder. The closest match for me turned out to be gulp-hashsum.

So this is my Gulp task for building the CSS.

// Process stylesheets
gulp.task('css', function () {
  return gulp.src(paths.css)
    .pipe(plumber({
      errorHandler: onError
    }))
    .pipe(sourcemaps.init())
    .pipe(autoprefixer({
      browsers: ['last 2 versions'],
      cascade: false
    }))
    .pipe(concat(paths.cssOutput))
    .pipe(cssnano())
    .pipe(gulpif(!isProduction, sourcemaps.write('.')))
    .pipe(gulp.dest(paths.cssDest));
});

In short, I’m using Gulp to do autoprefixing, then concatenate all my files, minify them, and lastly, if I’m not on production, add sourcemaps. So first we install gulp-hashum.

$ npm install gulp-hashsum --save-dev

Require it in our Gulpfile.js

var hashsum = require("gulp-hashsum");

Then take a quick look at the code example in the README.

gulp.src(["app/**/*.js"]).
    pipe(hashsum({dest: "app"}));

Hmm, ok. We don’t actually want to specify what files to get the checksum from. The simplest would just be to pipe hashsum() in my task right before we write the file to disk.

// Process stylesheets
gulp.task('css', function () {
  return gulp.src(paths.css)
    .pipe(plumber({
      errorHandler: onError
    }))
    .pipe(sourcemaps.init())
    .pipe(autoprefixer({
      browsers: ['last 2 versions'],
      cascade: false
    }))
    .pipe(concat(paths.cssOutput))
    .pipe(cssnano())
    .pipe(hashsum({filename: './_data/cache_bust_css.yml', hash: 'md5'}))
    .pipe(gulpif(!isProduction, sourcemaps.write('.')))
    .pipe(gulp.dest(paths.cssDest));
});

There we go! Right after cssnano() (on line 14) we grab the MD5 hash and write it to _data/cache_bust_css.yml. Let’s give it a go and see what our output is.

6ebeded38c4fc6c1b111172052b6ca17  ../src/css/styles.css

Oh. That’s not quite what we were after, but the fact is that a checksum file is supposed to look like this. No matter. I think we can do some magic in Jekyll to get what we want. As I mentioned earlier, all we need is a unique string to properly identify when a file has changed, so we can probably just use one of Jekyll’s output filters to truncate down to the first 10 characters. Luckily enough, there’s something called truncate that does just that. Damn, I love Jekyll (or Liquid)!

<link rel="stylesheet" href="{{ site.baseurl }}/gui/css/styles.css?version={{ site.data.cache_bust_css | truncate: 10, '' }}">

Let’s break down what I just did. Besides adding the ?version= query string to the href attribute, I also added {{ site.data.cache_bust_css }} which basically means output the content from the file _data/cache_bust_css.yml right into the template. I then added the truncation filter truncate: 10, '' to just show the first 10 characters from the file. The trailing comma and empty single quotes is just to make sure that truncate doesn’t add an ellipsis after the string, since that’s the default behavior.

All this will result in a nice, unique string appended to our files, and we didn’t have to muck about with special files names and how to pass that info into Jekyll.

<link rel="stylesheet" href="/gui/css/styles.css?version=362887da69">

Looking good! Just rinse and repeat for the JavaScript task in Gulpfile.js and we’re done!
Experimenting with better legibility for dyslexics

This morning, Heydon Pickering posted a link to an article detailing how special typefaces for dyslexics basically don’t work as expected.

Intrigued by this, as I have seen a few of these special typefaces and always wondered how they would help people with dyslexia, I had to read on. What caught my eye next was the proposed alternative to relying on special typefaces alone.

Is there anything that can be done through type to make reading easier for dyslexics? Yes. Studies have shown that dyslexics read up to 27% faster when text lines are very short, up to 18 characters per line, compared to the 60-65 characters of standard text. Putting as much space as possible between letters helps dyslexics too.

Sounds simple enough. With a bit of extra styling, this could be done easily, provided your front end code is up to snuff. Your front end code is up to snuff, right?

Using my own journal as an experiment

This is precisely why I keep a journal online; doing cool experiments (besides incoherent rambling, of course). With a few quick additions to my stylesheets and some quick and dirty hacking with JavaScript, I managed to quickly deploy a solution for my experiment. As per the article’s suggestion, I wanted to do a few simple things:

  • Decrease line width (i.e. fewer characters per line)
  • Increase letter spacing
  • Increase line height
  • Slightly increased font size

As one would expect, this wouldn’t require more than a few lines of extra code in the stylesheets. In addition, I also added some JavaScript to enable users to toggle the functionality.

The code

The basic concept involves just setting a modifier class to the <body> element. This would increase font-size, line-height and letter-spacing. In addition, the container for my content, .landmark-content as it is called, would have its width reduced in order to provide shorter lines of text.

/**
 * Dyslexic mode toggle
 */
.dyslexic-mode {
  font-size: 1.4em;
  letter-spacing: .25em;
  line-height: 2;
}
.dyslexic-mode .landmark-content {
  max-width: 26em;
}

I also added some quick styling for a <button> to be placed inside my banner region, to allow toggling of my dyslexics mode.

/* Toggle button */
.toggle-dyslexic-mode {
  font-size: .65em;
  margin-top: 0;
  position: absolute;
  top: 1.5em;
  right: 0;
}

JavaScript certainly isn’t my strongest skill, but I manage to get by. All we need to do in order to toggle our dyslexics mode is to toggle the modifier class on the <body>. To get a little progressive enhancement into the mix, I also added the toggle button with JavaScript. This of course means that if JavaScript is not available to the user, they can’t toggle the dyslexics mode. Then again, we won’t have a silly button in the banner region that does nothing.

/**
 * Toggle dyslexic mode
 */
function dyslexicMode() {

  // Place button inside role="banner"
  var toggleContainer = document.querySelector('[role="banner"] .landmark-content');

  // Create toggle button
  toggleContainer.insertAdjacentHTML('beforeend', '<button type="button" class="toggle-dyslexic-mode" data-text-original="Enable dyslexic mode" data-text-swap="Disable dyslexic mode">Enable dyslexic mode</button>');

  // Cache button selector
  var dyslexicButton = document.querySelector('.toggle-dyslexic-mode');

  // Function to toggle class and swap text on button
  function toggleDyslexicMode() {
    // Toggle the clas on <body>
    document.body.classList.toggle('dyslexic-mode');

    // Swap text on <button>
    if (dyslexicButton.getAttribute("data-text-swap") == dyslexicButton.innerHTML) {
      dyslexicButton.innerHTML = dyslexicButton.getAttribute("data-text-original");
    } else {
      dyslexicButton.setAttribute("data-text-original", dyslexicButton.innerHTML);
      dyslexicButton.innerHTML = dyslexicButton.getAttribute("data-text-swap");
    }
  }

  // Swap class & text on click
  dyslexicButton.addEventListener("click", toggleDyslexicMode, false);
}

dyslexicMode();

Note that I chose to do this with vanilla JavaScript, without any jQuery, because I really need to kick that awful habit of mine. As I said, this is pretty quick and dirty, so browser support is basically Internet Explorer 10 and up. Doing this with jQuery would likely be a few less lines of code (but then you’d also need to pull in the library). Since I employ the mustard cutting method for my journal, this code would never be run in legacy browsers anyway.

Taking this experiment further

Right now, users would need to toggle the function on each page visit. Nothing is being remembered, even within the same session. Hey, it’s a beta. Also, I’ve eyeballed the typographic tweaks and would need feedback from real people with dyslexia, in order to improve this or to even validate that this is something viable.

If you wish to give me feedback on this, feel free to hit me up on Twitter!

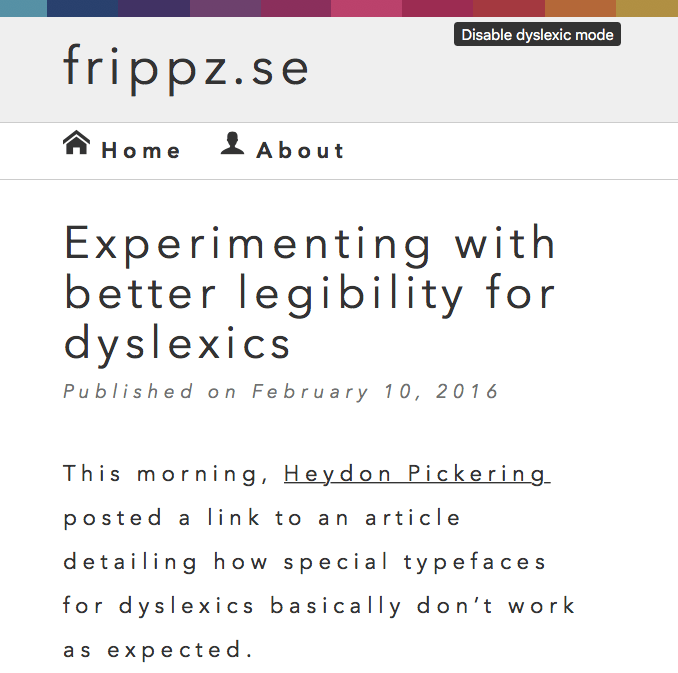
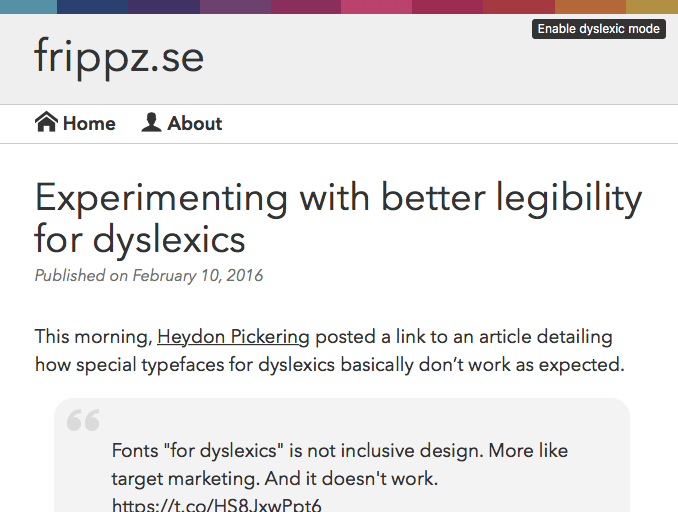
Update (2016-02-10): I’ve added two screenshots to showcase the difference between the two modes, should you have any issues toggling the looks of my own journal.

Pictured above: frippz.se without dyslexic mode
Pictured above: frippz.se with dyslexic mode

Update (2016-02-11): Kseso did an alternative solution using only HTML and CSS. While my current solution does use modern DOM API:s, it can pretty easily be adapted to support legacy browsers as well. Kseso’s solution relies on the :checked pseudo class, which limits the implementation possibilities a bit and won’t work in IE8 and below. Depending on your particular situation, this isn’t necessarily a problem.

Update (2016-11-11): As per this post, I’ve now disabled the toggle button on my own site and will be updating with a separate lab page to showcase the functionality.

Fixing blurry text on hardware accelerated elements

A customer project I was working on had the need for animated bubbles with text in them. They were used as information overlays and needed to move around smoothly. To accomplish this, all you need to do is apply transform: translate3d(0,0,0); to the element in question to enable hardware acceleration in most modern browsers. This, however, caused another issue; blurry text.

Doing a little bit of research revealed that for example Chrome and Safari transforms vector based text into textures when you apply translate3d, which in turn risks causing blurry text on the elements in question. The fix seems suspiciously simple.

.element-with-blurry-text {
  filter: blur(0);
}

This has appeared to have worked nicely in at least Safari 9 and Chrome 48. Some people have recommended to also add transform: translateY(0); as well, but I have been unable to confirm that this has any effect whatsoever. Your mileage may vary.